What is Azure Data Factory: Key components and concepts, use sases, pricing, and more
The availability of so much data is one of the greatest gifts of our day. But how does this impact a business when it’s transitioning to the cloud? Will your historic on-premise data be a hindrance if you’re looking to move to the cloud? What is Azure Data Factory (ADF) and how does it solve problems like this? Is it possible to enrich data generated in the cloud by using reference data from on-premise or other disparate data sources?
Fortunately, Microsoft Azure has answered these questions with a platform that allows users to create a workflow that can ingest data from both on-premises and cloud data stores, and transform or process data by using existing compute services such as Hadoop. Then, the results can be published to an on-premise or cloud data store for business intelligence (BI) applications to consume, which is known as Azure Data Factory.
Microsoft Azure has quickly emerged as one of the market's leading cloud service providers, and we want to help you get up to speed. Whether you are looking to study for an Azure certification or simply want to find out more about what this vendor can offer your enterprise, QA's robust Microsoft Azure Training Library has what you need. Contact us today to learn more about our course offerings and certification programmes.
What is Azure Data Factory?
Azure Data Factory is a cloud-based data integration service that allows you to create data-driven workflows in the cloud for orchestrating and automating data movement and data transformation.
ADF does not store any data itself. It allows you to create data-driven workflows to orchestrate the movement of data between supported data stores and then process the data using compute services in other regions or in an on-premise environment. It also allows you to monitor and manage workflows using both programmatic and UI mechanisms
Azure Data Factory use case
ADF can be used for:
- Supporting data migrations
- Getting data from a client’s server or online data to an Azure Data Lake
- Carrying out various data integration processes
- Integrating data from different ERP systems and loading it into Azure Synapse for reporting
How does Azure Data Factory work?
The Data Factory service allows you to create data pipelines that move and transform data and then run the pipelines on a specified schedule (hourly, daily, weekly, etc.). This means the data that is consumed and produced by workflows is time-sliced data, and we can specify the pipeline mode as scheduled (once a day) or one time.
Azure Data Factory pipelines (data-driven workflows) typically perform three steps.
Step 1: Connect and Collect
Connect to all the required sources of data and processing such as SaaS services, file shares, FTP, and web services. Then, move the data as needed to a centralised location for subsequent processing by using the Copy Activity in a data pipeline to move data from both on-premise and cloud source data stores to a centralisation data store in the cloud for further analysis.
Step 2: Transform and Enrich
Once data is present in a centralised data store in the cloud, it is transformed using compute services such as HDInsight Hadoop, Spark, Azure Data Lake Analytics, and Machine Learning.
Step 3: Publish
Deliver transformed data from the cloud to on-premise sources like SQL Server or keep it in your cloud storage sources for consumption by BI and analytics tools and other applications.
Data migration activities with Azure Data Factor
By using Microsoft Azure Data Factory, data migration occurs between two cloud data stores and between an on-premise data store and a cloud data store.
Copy Activity in Azure Data Factory copies data from a source data store to a sink data store. Azure supports various data stores such as source or sink data stores like Azure Blob storage, Azure Cosmos DB (DocumentDB API), Azure Data Lake Store, Oracle, Cassandra, etc. For more information about Azure Data Factory supported data stores for data movement activities, refer to Azure documentation for data movement activities.
Azure Data Factory supports transformation activities such as Hive, MapReduce, Spark, etc that can be added to pipelines either individually or chained with other activities. For more information about ADF-supported data stores for data transformation activities, refer to the following Azure Data Factory documentation: Transform data in Azure Data Factory.
If you want to move data to/from a data store that Copy Activity doesn’t support, you should use a .NET custom activity in Azure Data Factory with your own logic for copying/moving data. To learn more about creating and using a custom activity, check the Azure documentation and see "Use custom activities in an Azure Data Factory pipeline".
Azure Data Factory key components
Azure data Factory has four key components that work together to define input and output data, processing events, and the schedule and resources required to execute the desired data flow:
- Datasets represent data structures within the data stores. An input dataset represents the input for an activity in the pipeline. An output dataset represents the output for the activity. For example, an Azure Blob dataset specifies the blob container and folder in the Azure Blob Storage from which the pipeline should read the data. Or, an Azure SQL Table dataset specifies the table to which the output data is written by the activity.
- A pipeline is a group of activities. They are used to group activities into a unit that together performs a task. A data factory may have one or more pipelines. For example, a pipeline could contain a group of activities that ingests data from an Azure blob and then runs a Hive query on an HDInsight cluster to partition the data.
- Activities define the actions to perform on your data. Currently, Azure Data Factory supports two types of activities: data movement and data transformation.
Linked services define the information needed for Azure Data Factory to connect to external resources. For example, an Azure Storage linked service specifies a connection string to connect to the Azure Storage account.
How the Azure Data Factory components work together
The following schema shows us the relationships between the Dataset, Activity, Pipeline, and Linked Services components:

Azure Data Factory access zones
Currently, you can create data factories in the West US, East US, and North Europe regions. However, a data factory can access data stores and compute services in other Azure regions to move data between data stores or process data using compute services.
For example, let’s say that your compute environments such as Azure HDInsight cluster and Azure Machine Learning are running out of the West Europe region. You can create and use an Azure Data Factory instance in North Europe and use it to schedule jobs on your compute environments in West Europe. It takes a few milliseconds for Data Factory to trigger the job on your compute environment but the time for running the job on your computing environment does not change.
You can use one of the following tools or APIs to create data pipelines in Azure Data Factory:
- Azure portal
- Visual Studio
- PowerShell
- .NET API
- REST API
- Azure Resource Manager template
Data Migration in action
To get started with Data Factory, you should create a Data Factory on Azure, then create the four key components with Azure Portal, Visual Studio, or PowerShell etc. Since the four components are in editable JSON format, you can also deploy them in a whole ARM template on the fly.
Now, we’ll set our scenario to migrate a simple table with two columns (name and type) for several records from Azure Blob storage to Azure Database.
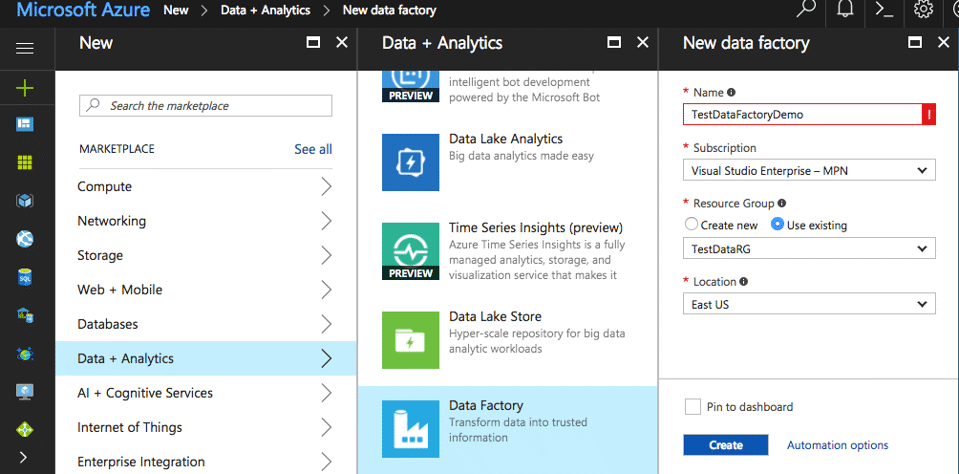
To create a Data Factory with Azure Portal, you will start by logging into the Azure portal. Click NEW on the left menu, click Data + Analytics, and then choose Data Factory.

In the New data factory blade, enter TestDataFactoryDemo for the Name. Then choose your subscription, resource group, and region. Finally, click Create on the New data factory blade.

By using Visual Studio 2013 or 2015, you can create a Visual Studio project using the Data Factory project template, define Data Factory entities (linked services, datasets, and pipeline) in JSON format, and then publish/deploy these entities to the cloud.
If you’re using PowerShell, you can create a Data Factory by using the following command if you have a contributor or administrator for your subscription. In my case, I named it with TestDataFactoryDemo and placed it in the TestDataRG resource group:
New-AzureRmDataFactory -ResourceGroupName TestDataRG -Name TestDataFactoryDemo –Location "West US"
DataCopy Wizard on Azure
To start migrating the data on Blob storage to Azure SQL, the most simple way is to use Data Copy Wizard, which is currently in preview. It allows you to quickly create a data pipeline that copies data from a supported source data store to a supported destination data store. For more information on creating your migration related components with Data Copy Wizard, refer to the Microsoft tutorial: Create a pipeline with Copy Activity using Data Factory Copy Wizard.
After you specify each step of the copy wizard, you will see a recap at the end, like the one below:

Click ‘Next’ and the copy wizard will go into action. As in the following screenshot, you can see the details information about each task achieved by the wizard during deployment.

Custom DataCopy Activities
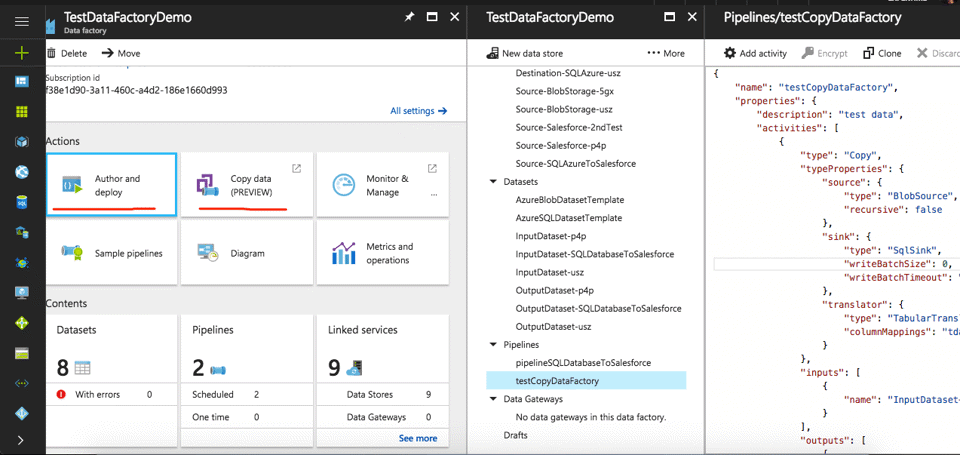
In addition to the DataCopy Wizard, the more general way is to customise your activities by creating each of the key components by yourself. As I mentioned before, Azure Data Factory entities (linked services, datasets, and pipeline) are in JSON format, so you can use your favourite editor to create these files and then copy to Azure portal (by choosing Author and deploy) or continue in the Data Factory project created by Visual Studio, or put them in the right folder path and execute them with PowerShell.
In the following screenshot, you can see where I deployed my custom DataCopy Activities.

Because we are migrating data from Azure Blob storage to Azure Database, we will start by creating Linked Services. Here, it is important is to specify the connection string of each data store.
The source store is Azure Blob Storage, so the linked service JSON is as follows:
{
   "name": "Source-BlobStorage-usz",
   "properties": {
       "hubName": "testdatafactorydemo_hub",
       "type": "AzureStorage",
       "typeProperties": {
"connectionString": "DefaultEndpointsProtocol=https;AccountName=testdatafastorageaccount;AccountKey=**********"
       }
   }
}
Here, the sink store is Azure Database, so the linked service is as follows:
{
   "name": "Destination-SQLAzure-usz",
   "properties": {
       "hubName": "testdatafactorydemo_hub",
       "type": "AzureSqlDatabase",
       "typeProperties": {
           "connectionString": "Data Source=testdatafactorydatabase.database.windows.net;Initial Catalog=DataDB;Integrated Security=False;User ID=testdatafactorydblogin;Password=**********;Connect Timeout=30;Encrypt=True"
       }
   }
}
Then, we can create the input dataset and output dataset, which, in our case, contains the data structure. For more information about the dataset JSON, please refer to Datasets in Azure Data Factory.
Example for input dataset JSON:
{
   "name": "InputDataset-usz",
   "properties": {
       "structure": [
           {
               "name": "tdate",
               "type": "Datetime"
           },
           {
               "name": "amount",
               "type": "Double"
           }
       ],
       "published": false,
       "type": "AzureBlob",
       "linkedServiceName": "Source-BlobStorage-usz",
       "typeProperties": {
           "fileName": "testData.txt",
           "folderPath": "adf-data",
           "format": {
               "type": "TextFormat",
               "columnDelimiter": ",",
               "skipLineCount": 0,
               "firstRowAsHeader": true
           }
       },
       "availability": {
           "frequency": "Day",
           "interval": 1
       },
       "external": true,
       "policy": {}
   }
}
Example for output dataset JSON:
{
   "name": "OutputDataset-usz",
   "properties": {
       "structure": [
           {
               "name": "tdate",
               "type": "Datetime"
           },
           {
               "name": "amount",
               "type": "Decimal"
           }
       ],
       "published": false,
       "type": "AzureSqlTable",
       "linkedServiceName": "Destination-SQLAzure-usz",
       "typeProperties": {
           "tableName": "[dbo].[transactions]"
       },
       "availability": {
           "frequency": "Day",
           "interval": 1
       },
       "external": false,
       "policy": {}
   }
}
Finally, let’s create the pipeline that contains all the activities during the data migration process. The most important part is schema mapping. For more information about the pipeline JSON, please refer to Pipelines and Activities in Azure Data Factory.
Here is an example:
{
   "name": "testCopyDataFactory",
   "properties": {
       "description": "test data",
       "activities": [
           {
               "type": "Copy",
               "typeProperties": {
                   "source": {
                       "type": "BlobSource",
                       "recursive": false
                   },
                   "sink": {
                       "type": "SqlSink",
                       "writeBatchSize": 0,
                       "writeBatchTimeout": "00:00:00"
                   },
                   "translator": {
                       "type": "TabularTranslator",
                       "columnMappings": "tdate:tdate,amount:amount"
                   }
               },
               "inputs": [
                   {
                       "name": "InputDataset-usz"
                   }
               ],
               "outputs": [
                   {
                       "name": "OutputDataset-usz"
                   }
               ],
               "policy": {
                   "timeout": "1.00:00:00",
                   "concurrency": 1,
                   "executionPriorityOrder": "NewestFirst",
                   "style": "StartOfInterval",
                   "retry": 3,
                   "longRetry": 0,
                   "longRetryInterval": "00:00:00"
               },
               "scheduler": {
                   "frequency": "Day",
                   "interval": 1
               },
               "name": "Activity-0-testData_txt->[dbo]_[transactions]"
           }
       ],
       "start": "2017-04-13T14:10:03.876Z",
       "end": "2099-12-30T23:00:00Z",
       "isPaused": false,
       "hubName": "testdatafactorydemo_hub",
       "pipelineMode": "Scheduled"
   }
}
Monitor and manage Azure Data Factory pipelines
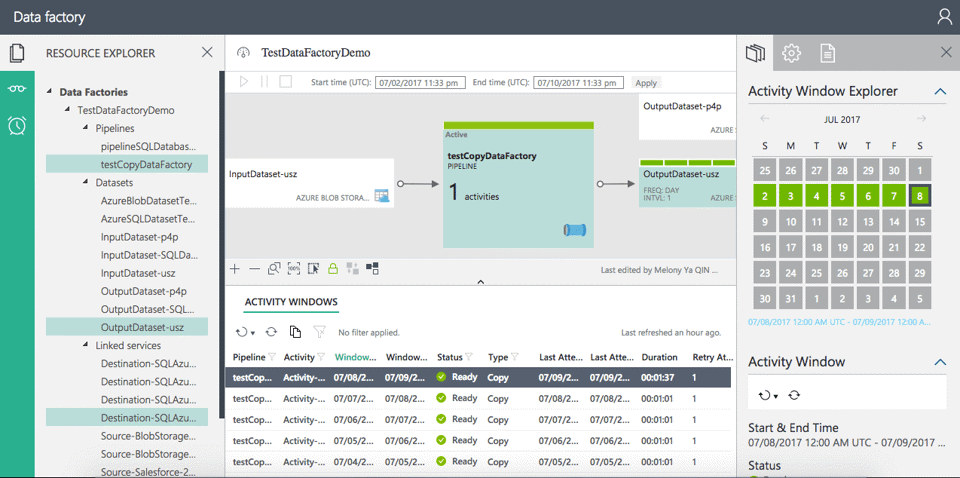
As mentioned, Azure Data Factory also provides a way to monitor and manage pipelines. To launch the Monitor and Management app, click the Monitor & Manage tile on the Data Factory blade for your data factory.There are three tabs on the left: Resource Explorer, Monitoring Views, and Alerts. The first tab (Resource Explorer) is selected by default.
You will see the following
- The Resource Explorer tree view in the left pane
- The Diagram View at the top of the middle pane
- The Activity Windows list at the bottom of the middle pane
- The Properties, Activity Window Explorer, and Script tabs in the right pane
In Resource Explorer, you will see all resources (pipelines, datasets, linked services) in the data factory in a tree view, as in the following screenshot:

Final Result Test
To quickly verify that your data has been migrated in your Azure SQL, I recommend installing sql-cli via npm, then connect to your Azure SQL Database. The sql-cli is a cross-platform command line interface for SQL Server. You can install it by using the following command
npm install -g sql-cli
Then, connect to your SQL Database by using the following command:
mssql -s yoursqlDBaddress -u username -p password -d databasename -e
Finally, you can test your Azure SQL Database with a normal SQL request like the following:

Azure Data Factory pricing
With Data Factory, you pay only for what you need. In fact, pricing for data pipeline is calculated based on
- Pipeline orchestration and execution;
- Data flow execution and debugging;
- Number of Data Factory operations such as create pipelines and pipeline monitoring
If you want to have a full overview, we recommend checking the Azure Data Factory documentation
Learn Azure Data Factory

Let's talk
Start your digital transformation journey today
Contact us today via the form or give us a call.
